

Blog Detail
22
July
How to Repair A Washing Machine at Home
Is your washing machine acting up throwing a wrench (or a sock) into your laundry routine? Don't despair! Before you call a repair person, consider tackling some standard washing machine repairs yourself. This guide will help you identify the issue, determine whether a do-it-yourself solution is feasible, and demonstrate several necessary home repairs.
Diagnosing the Problem: Become a Washing Machine Detective
The first step to a successful washing machine repair is a proper diagnosis. Here are some telltale signs of standard washing machine problems:
- Not Spinning: A washer that won't spin leaves your clothes wet. A clogged drain filter, a faulty lid switch, or a drive belt issue could cause this.
- Not Draining: Standing water in your washer is a sure sign of a drainage problem. Clogged filters, hoses, or a malfunctioning drain pump could be the culprits.
- Not Filling: If your washer struggles to fill with water, the inlet valve, water pressure, or a faulty fill switch might be the issue.
- Excessive Noise: Grinding, banging, or clunking noises during operation indicate potential problems with the drum bearings, motor, or loose objects caught within the machine.
- Leaking: Leaks can originate from loose hoses, a damaged door seal, or a faulty dispenser.
Gather Your Tools
Once you've identified the potential problem, gather the necessary tools. Basic repairs often require a screwdriver set, pliers, a wrench set, and a bucket (for any water drainage). Depending on the repair, you might need additional parts like a replacement belt, drain filter, or hose clamps.
Common Washing Machine Repairs You Can Tackle at Home
Here's a breakdown of some common washing machine repairs you can attempt yourself along with step-by-step instructions:
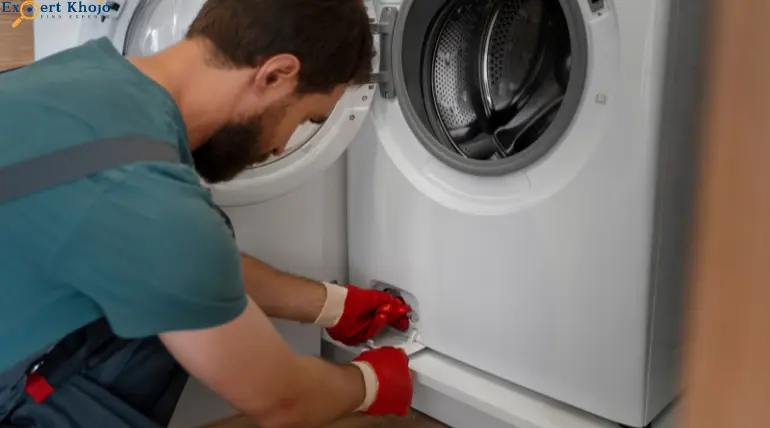
- Most washing machines have a drain filter typically at the front bottom corner behind a small access panel.
- To capture any spilt water, place a bucket underneath the filter.
- Unscrew or unclip the filter access panel and carefully remove the filter.
- Clean any debris like coins, buttons, or lint from the filter.
- Rinse the filter under running water and reinstall it securely.
- Note: Replacing a drive belt requires accessing the washing machine's internal components. If you're uncomfortable doing so, it's best to call a professional.
- Tilt the washer slightly and locate the drive belt connecting the motor to the drum.
- To give the belt some slack, loosen the motor mount bolts.
- Slide the old belt off the pulleys and obliterate it.
- Loop the new belt around the pulleys ensuring proper alignment.
- Tighten the motor mount bolts ensuring the belt has the correct tension.
- The lid switch ensures the washer doesn't operate when the lid is open.
- Locate the lid switch typically positioned near the door frame.
- Consult your washing machine's manual for specific instructions on accessing and testing the switch with a multimeter.
- If the switch is broken, replace it with a comparable model by following the manufacturer's guidelines.
- Complex Electrical Issues: If it involves wiring or control panels, leave it to a qualified technician.
- Major Component Failure: Replacing a damaged motor, transmission, or circuit board is a job for a professional.
- Extensive Leaks: Significant leaks could indicate a more profound issue requiring professional assessment and repair.
- Location: The drain pump is typically nestled at the bottom front of your washing machine, often behind a removable kick panel. For information on the precise location unique to your model, refer to your user manual.
- Power Down and Prep: Before disassembly, ensure the washing machine is unplugged from the power source. Place towels around the work area to absorb any spills or drips.
- Hose Detachment: Locate the hoses connected to the drain pump. Refer to your user manual for specific hose placements as some washing machines might have additional hoses connected for overflow prevention or other functions. Carefully detach the hoses using pliers or loosening hose clamps (depending on the connection type). Be prepared for some residual water to drain out when the hoses are disconnected.
- Impeller Inspection: With the hoses removed, you should now have access to the drain pump itself. The pump's core is the impeller, a small fan-like blade that spins to propel water from the washing machine. Carefully remove any debris like coins, buttons, or hair clumps that might obstruct the impeller's rotation. Use a flashlight for better visibility if needed.
- Cleaning and Reassembly: Once the debris is removed, you can use a small brush or a rag to clean any visible grime or buildup within the pump housing. Caution: Avoid using harsh chemicals or excessive force during cleaning as you don't want to damage the delicate pump components.
- Secure Reconnection: Once everything is clean, carefully reattach the hoses to the drain pump ensuring a safe and leak-proof connection. Re-tighten any hose clamps or use new ones if the old ones appear worn or damaged.
- Test Run: Before putting everything back together, re-plug the washing machine and run a short rinse cycle to test the drainage function. Inspect whether the water drains correctly and keep an ear out for any strange noises. If the issue persists, there might be a deeper problem within the drain pump requiring professional attention.
- The inlet valve acts as the gateway for water entering your washing machine. When it malfunctions, you might experience issues like underfilling (not enough water entering) or overflowing (water continuously filling even when the washer is complete). Replacing an inlet valve involves disassembly and working with water lines, so assess your comfort level before proceeding.
- Safety First: Always shut off the water supply to the washing machine before attempting any work involving the inlet valve. Locate the shut-off valve near the connection point where the water line enters your home. Close the water supply entirely by turning the valve clockwise until it stops.
- Power Down and Locate: Disconnect the washing machine from the power outlet for additional safety. The inlet valve is usually positioned behind the control panel. For detailed instructions on how to access your model's control panel, refer to the user manual. This might involve removing screws or using specialized tools to detach the panel carefully.
- Manual Magic: Your user manual is your best friend during this process. It will offer detailed instructions on removing the faulty inlet valve, including disconnecting any electrical wiring harnesses and hose connections. Follow these instructions meticulously, taking pictures or notes to ensure proper reassembly later.
- Matching the Replacement: Once the old valve is removed, take it with you when purchasing a replacement. This ensures you get an exact match that is compatible with your washing machine model.
- Installation and Testing: When installing the new inlet valve, meticulously follow the reverse order of the removal process as outlined in your user manual. Pay close attention to secure electrical connections and ensure water line connections are leak-proof using hose clamps or gaskets.
- Power Up and Test: Once everything is reassembled, turn on the water supply valve and reconnect the washing machine to power. Run a short wash cycle to test the water flow. Observe if the water fills to the appropriate level and if there are any leaks around the newly installed valve.
- Door Seal Defense: If left unchecked, the rubber gasket around the washing machine door can become a breeding ground for mould and mildew. Use a fresh, dry cloth to wipe the door seal after every washing cycle to eliminate any moisture and stop accumulation. To sanitize the seal once a month, use a diluted bleach solution (1 part bleach to 10 parts water). Afterwards, wipe it clean with fresh water.
- Detergent Dispenser Deep Clean: The drawer where you add your laundry soap can harbour detergent residue, fabric softener build-up, and even mould growth over time. Every few months, remove the drawer completely (consult your manual for specific removal instructions). Wash the drawer thoroughly with warm soapy water and a soft brush. Pay close attention to any hidden compartments or nooks where residue might accumulate. Let the drawer air dry completely before reinstalling it.
- Drain Filter Defender: The drain filter, typically located at the bottom front corner of your washing machine behind a small access panel, traps debris like coins, buttons, and lint. Once a month, remove the drain filter and clean it under running water to remove any trapped objects. Inspect the filter housing for any buildup and clean it with a soft brush if necessary.
- Know Your Limits: Don't overload your washing machine. Exceeding the recommended weight capacity for your washer can strain the motor, lead to unbalanced loads that cause excessive vibration, and potentially damage the drum bearings. Consult your user manual for the specific weight capacity of your model.
- Sorting Savvy: Sort your laundry by fabric type and weight before loading. Heavier items like towels can strain the machine during the spin cycle. Washing similar-weight items together allows for a more balanced load and smoother operation.
- Zipper Patrol: Close zippers and fasten buttons before tossing clothes in the washer. Loose fasteners can snag on other garments or damage the drum during the wash cycle.
- Read the Label: Always follow the detergent manufacturer's recommendations for dosage based on your load size and water hardness. Using too much detergent can create excessive suds, leading to a buildup in the machine and reducing cleaning effectiveness.
- High Efficiency (HE) Heroes: If you have a High-Efficiency (HE) washing machine, use only HE detergents formulated explicitly for these machines. Regular detergents can create excessive suds in HE washers, hindering their cleaning performance.
- Soft on Fabrics, Tough on Buildup: Consider using a washing machine cleaner every few months, especially in areas with hard water. These cleaners help remove mineral buildup that can accumulate in the machine over time, potentially leading to malfunctions.
- After each wash cycle, leave the washing machine door open to allow moisture to evaporate and prevent mould growth within the drum. You can also wipe down the inside of the drum with a clean, dry cloth to remove any lingering moisture.
Cleaning a Clogged Drain Filter
Replacing a Drive Belt
Checking and Replacing the Lid Switch:
When to Call a Professional
While some repairs are DIY-friendly, some require a professional's touch. Here are some signs it's best to call a washing machine repair person:
Empowering Yourself as a Washing Machine Repair Guru
By following these steps and with a little DIY spirit, you can conquer many common washing machine problems. Always remember that safety comes first and always seek professional advice when in doubt. By tackling these repairs yourself, you'll gain valuable knowledge about your washing machine and save money on repair costs.
Advanced Washing Machine Repairs: Taking it a Step Further
While unclogging a drain pump and replacing a faulty inlet valve are excellent DIY wins, some washing machine problems require a deeper dive. Here's a more detailed look at these repairs and additional considerations to help you determine if you're comfortable tackling them yourself.
Unclogging a Drain Pump:
Replacing a Faulty Inlet Valve:
Remember When in Doubt Call a Professional
While these repairs can be tackled at home with the right tools and information, prioritize safety. If you need clarification on any step in the process, feel free to call a qualified appliance repair technician. They have the expertise and experience to diagnose and fix the problem efficiently, minimizing the risk of further damage.
Preventative Maintenance: Keeping Your Washing Machine a Laundry Room Champion
Your washing machine requires routine maintenance to stay in top condition and handle mountains of laundry for years to come, just like any dedicated athlete. The following crucial preventive actions can help you extend the life of your washing machine and reduce the cost of future repairs:
Cleaning Crusaders: Banishing Mold and Mildew
Loading Like a Pro: Avoiding Overwork and Strain
Detergent Decisions: Choosing Wisely
Bonus Tip: Let Your Machine Breathe
Conclusion
Repairing your washing machine at home can be a cost-effective and empowering experience. By diagnosing common issues, gathering the right tools, and following step-by-step repair guides, you can tackle many problems yourself. Always prioritize safety by unplugging the machine before any repairs and knowing when to call a professional for complex issues. Regular maintenance and proper usage can extend your washing machine's life, ensuring it remains a reliable part of your household for years.